Teneriffe (Kamikaze) Falls

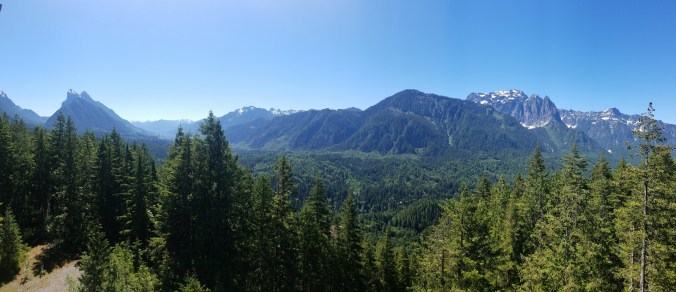
I did the hike to Teneriffe Falls back in March when it was much cooler, which I appreciated because the trail is uncovered for much of the way up to the falls. At the time, the parking lot at the Teneriffe trailhead was packed so we made our way from the Si lot instead–it added on an extra 3 miles round trip, but made for a nice warm-up/cooldown. You are required to hang a Discover Pass on your dashboard at both the Mount Si and Teneriffe parking lots, so prepare for that when you plan your hike. This hike is 6 miles round trip, with an elevation gain of almost 1500 feet. While not exactly Mailbox, Teneriffe boasts its fair share of rocky terrain, especially near then end towards the falls. It also has what feels like endless switchbacks, although the views along the way make up for it. The end of the trail is clearly less maintained than the first couple of miles, so watch where you step because it can be slippery (at least, it was in March!) and gets worse as you get closer to the waterfall. Teneriffe Falls is gorgeous–it makes the list of my Top 10 Favorite Waterfall Hikes! I looked up at crystal clear water cascading down a sheer rock wall and just felt utterly small–I would 100% recommend this hike to anyone, and am looking forward to going again in the future!


Heybrook Lookout

This past weekend was the hottest of the year thus far, so I decided to ease into hiking in heat by tackling Heybrook Lookout. Located off US Highway 2 in Index, this hike is a very short 1.25 miles up with nearly 900 feet of elevation gain to the lookout. The first half of the trail leading to the top is the steepest, but it’s mostly shaded by tall trees and then levels off after the initial trek uphill.The trail is well-maintained and easy to navigate, and there was no litter on the hike (always a pleasant surprise!). There is a viewpoint near the top, where you have your first view of the mountains–we took pictures at this point but reached the lookout tower within minutes of continuing on the trail. The last stretch consists of climbing almost 100 stairs to the top of the tower, where we were rewarded with gorgeous 180° views of Mount Baring, Mount Index and Mount Persis. I would highly recommend this hike as a beginner’s alternative to Rattlesnake Ledge, as it has a great payoff for being easy/moderate difficulty.

Panoramic View from the Lookout


Rattlesnake Mountain

A few weekends back, I decided to take a solo sunrise hike to the top of Rattlesnake Ledge. As I noted in a previous post about this hike, Rattlesnake is an easy 2 mile hike up to the top, so I figured I could getting to the trailhead an hour before the estimated 5:15am sunrise would give me plenty of time. I brought a picnic blanket, lunch and a book, and set off from my apartment at 3:30–since there was almost no traffic to speak of, the drive was much shorter than usual. The main parking lot was gated, so I ended up parking in the limited space next to it. It wasn’t until I reached the map at the start of the trail that I realized I had driven to the Snoqualmie Point side of Rattlesnake, about a 10.5 mile trek from where I wanted to be by sunrise. Since I couldn’t possibly make it there in time, I decided to go for the new trail instead (unlike Rattlesnake Ledge, this side of the mountain requires a Discover Pass, so make sure to hang yours before starting your hike).

I made it to the first viewpoint, Stan’s Overlook, at 2.5 miles in and caught the sunrise–it was gorgeous! The trail was relatively easy and well-maintained, even throughout the forested area. I did get to walk through several spiderwebs on the way up to Grand Prospect, which is 5 miles in and served as my stopping point for the day. I put on sunscreen, set up my blanket and started reading. I didn’t see a soul until around 8am, when a trail runner who was planning on doing the entire 21 miles to and from the Ledge passed by. It was so peaceful here, and although I obviously can’t speak for the entire length of the trail, I would highly recommend Rattlesnake Mountain for an easy day hike, 6.5/10!


Mailbox Peak

Since my old housemate (Logan) is moving this week, I decided to send him off in the best way I know how–with a grueling hike through the woods to a ridiculously gorgeous viewpoint. Mailbox Peak (Old Trail) is one standard by which hikers in the PNW are measured, featuring an almost 4000 foot elevation gain in a short 2.5 miles. However, Logan hadn’t been hiking in a while, so we were planning on taking New Trail instead, which is half as steep and twice as long. We left from Kent at 8am sharp and arrived at the trailhead around 9–this hike requires the Discover Pass at the parking lot–and headed up to the trail. We somehow managed to completely misinterpret the map at the bottom and ended up taking Old Trail anyway.

Old Trail is everything they say about hiking Mailbox–it is a steep, poorly maintained (although there are reflective markers on trees along the way), relentless trail with few switchbacks. Despite it being the most challenging hike I’ve done to date, I found it to be much more enjoyable than I was anticipating. It helped that the day started off cool–we walked through a few clouds on the way up–and I can’t imagine doing this particular hike in mid-summer heat.

The majority of Old Trail takes you through a seemingly never-ending wooded area. We definitely got lost a couple of times, since the “trail” is pretty unclear at times, but luckily were eventually able to locate the reflective markers every time. There were quite a few other people taking Old Trail too, so we tried to keep an eye out for hikers who knew where they were going when possible. We played leapfrog with a group of hikers all the way up–in fact, we passed each other so often that we actually learned their names! Continue reading

An Afternoon Trek to Franklin Falls

One of my friends recently got into hiking and the outdoors, so we decided to plan a short, weekday trek to Franklin Falls after work. It was a rainy day, so we came prepared with raincoats, gaiters, hats and waterproof hiking boots. The drive to the trailhead was easy once we hopped on I-90, and after taking Exit 47 there was almost no traffic at all. We parked in the Denny Creek lot, but soon realized that there was no connecting trail that would allow us to get to Franklin Falls from that trailhead. Luckily, it was a short drive to the correct lot (the Franklin Falls lot is very well painted and is a quick walk to the start of the trail), where we hung our Northwest Forest pass and started trekking. The hike is very easy, coming in at 2 miles round-trip and a total elevation gain of only a few hundred feet. With its well-maintained path and consistent river views, the hike to Franklin Falls would be a great outdoors activity with children, although they may need some assistance navigating the slippery rocks near the end of the trail. Between the  raging waterfall and the waves from the river crashing up against the rocky shore, the view at the end was spectacular. I’m sure this hike would be just as beautiful on a sunny day, but there was something particularly Pacific Northwest about the fog hugging the trees and the looming gray skies. All in all, I would rate this hike a solid 7/10 if you want an easy jaunt to a gorgeous payoff.

Panoramic Views

The Ten Essentials

I’ve heard some people say that hiking is a universal hobby, a way to have fun with other people that only requires time and physical ability, rather than money. What I’ve found to be more accurate is that while this is technically true, the reality for me is that the more I hike, the more equipment I convince myself is necessary to do so. This is in addition to the Ten Essentials, which can be purchased on a budget but should not be skimped on either.

You can find variations of this list all over the internet, but I will share REI’s here because it’s my favorite version:

  1. Navigation (map and compass)
    • GPS technology has become much more widely available for the consumer to purchase, but I would argue that being able to accurately read a map is one of the most important skills a hiker can have. Whether you are only interested in day hikes or you are planning a week-long backpacking trip, being prepared for an emergency requires you to know how to navigate the area you’re exploring. Compasses can be generally found for anywhere between $10 and $100, so there’s no excuse to not have one to bring on your hiking, backpacking or camping trips.
  2. Sun protection (sunglasses and sunscreen)
  3. Insulation (extra clothing)
    • Layers, layers, layers! I highly recommend wearing multiple, thinner layers rather than bulky coats–this allows you to remove articles of clothing in increments when you get warm. Additionally, it allows you to have dry clothes under an outer, waterproof/resistant shell when it’s raining, as it so often does here in the PNW.
  4. Illumination (headlamp/flashlight)
    • Flashlights will do the job if they are all you have, but headlamps are much more convenient when you’re hiking in the dark. Having your hands free is a huge advantage, and headlamps also give you a wider view with better peripheral vision.
  5. First-aid supplies
    • The basics: bandages (various sizes), instant ice pack, antibacterial wipes/ointment, elastic bandage wrap, gauze, medical tape, mini scissors, tweezers, Benedryl (or another diphenhydramine), disposable gloves, Aspirin, etc.
  6. Fire (waterproof matches/lighter/candles)
  7. Repair kit and tools
  8. Nutrition (extra food)
    • I always bring enough food for at least one extra day, just in case something goes south and I need to wait for emergency assistance.
  9. Hydration (extra water)
    • Water weighs 1kg per liter, or about 2.2 pounds, making it one of the heavier items you’ll carry with you on any given hike. However, one of the great things about consumables is that their weight decreases as you use them. I would recommend getting a hydration bladder or a collapsible water bottle to keep it as light as possible, but I know some people prefer solid water bottles instead–so, do what works best for you!
  10. Emergency shelter


In the future, I’d like to share my thoughts on the equipment I use, and I am always looking for suggestions! Happy hiking!

The Meetup Mix-Up: Coal Creek Falls

In order to fully delve into the craziness that was today, I have to start at the beginning. I downloaded an app called Meetup a while back, which brings together all sorts of people with the same hobbies and interests. I immediately joined several hiking-related groups in the Seattle region, and quickly found a hike I was interested in–an 11.4 mile round-trip trek on Wright Mountain*. The hike is described on wta.com as being “a scramble up a peak near Snow Lake,” which is something I had never done before. The requirements to RSVP included traction (microspikes, crampons, snowshoes, etc.), trekking poles, pants that allow for glissading down snowy slopes, and being in good physical shape. Meeting all but one of these, I signed up and planned on buying snow pants, which I ended up purchasing the day before the hike from a nice lady on Offer Up (Burton DryRides for $80).

Fast-forward to this morning at the Bellevue Park and Ride where I found the crew ready to go. I confirmed it was the Meetup headed to Wright Mountain and we got into our carpool groups, but by the time we arrived at the trailhead, I was certain this group was not headed to Wright Mountain. The person I had asked at the Park and Ride must not have heard me correctly–I was on the wrong trip! I didn’t want to ask my driver to turn back, and I was definitely too late to join the Wright Mountain hike anyway, so I went with it (if you were on today’s SOA Coal Creek Falls Meetup, now you know the real reason my bag was so heavy!). So, if you ever do a hiking meetup, triple check that the hike you’re joining is the correct one. Continue reading

Rattlesnake Ledge

Whether you’re a first-timer or a seasoned hiker, Rattlesnake Ledge is my go-to suggestion for an introduction to hiking in Washington. In fact, Rattlesnake was the very first hike I did in the Greater Seattle Area, and it set the stage for a lifetime of trail wanderlust. Rattlesnake is located in North Bend off I-90, an easy drive east of Seattle. The main reason this hike is so popular is that the view is a spectacular payoff for short and non-strenuous. The entire trek comes in at 4 miles round-trip and an elevation cap of around 2000 feet. It has such a clearly marked trail that it’s impossible to get lost if you follow the path, and it continues to be well-maintained. Another reason for Rattlesnake’s popularity is that it is one of the trails that does not require a parking pass to visit, which is huge in this state. I do recommend getting to the parking lot early in order to beat the crowds–this hike can be especially crowded on clear, sunny days–and make sure that you go to “Rattlesnake Ledge” rather than “Rattlesnake Mountain” or “Rattlesnake Ridge.” If you end up at the Snolqualmie lot on the other side of the mountain, it will be a 21-mile round-trip trek to the view shown here. Rattlesnake is one of my favorites in the Pacific Northwest, and I’m looking forward to visiting the top with all sorts of people in the coming years.


An Introduction

I probably haven’t done enough hiking in my life to be blogging about it, but it has quickly become one of my passions so I’m writing a hiking blog anyway. I honestly don’t know what I would do if I couldn’t escape to the trails to clear my head and find myself–connecting with nature on the weekends gets me through long work weeks and stressful situations. While I’m certainly no expert, I’d like to be able to share what I know of the outdoors, of breathing in wilderness and freedom, and the pure joy of hiking.